Book-Themed Birthday

Thursday, June 13, 2013

I'm a self-proclaimed book addict. I have books shoved into the corners of just about every room of the house... and an embarrassingly large 'wish list' on Amazon which would certainly cause my shelves to burst at the seams.

Husband and I have cultivated a love of reading in Little Tomato as well. She has an impressive library herself, and we have read every. single. book. Many, many times. She loves books. After her bedtime book (or two, or three...) she almost always asks for 'just a few minutes more' to read alone. I have found her awake, flashlight in hand, pouring over a book when she was supposed to be sleeping, and snoring away in bed with a book propped in her lap. 

This past week was her birthday. My Little Tomato is five years old. As she is starting school this year, I know she will transition to wanting 'friend birthday parties' in place of the family scene, and she will begin to want to pick her own theme. This was my last unhindered party-planning for my little girl and I wanted to make it special.

Her party was a book theme. The invitations were library-style, edited from this free printable. I printed it off on cardstock, and used washi tape to attach it to a book graphic for a layered and more colorful effect.

I kept with a purple color as a running theme through the decorations, as purple is one of her favorite colors and her birthday dress was a light lavender.


I looked for solid wrapping paper in various hues of purple and used it (and kraft paper) to wrap books we had on hand and stacked them as decorations.

I found this great tutorial on making paper roses and used book pages to make roses as decorations. 

Thin ribbon, bamboo skewers and cotton 'page print' banners found in the scrapbooking section of Hobby Lobby were used to decorate the cake. When Little Tomato saw the picture of the cake I gave to the bakery for inspiration, her heart was set on a horse on her cake too. So, while it has nothing to do with books... it was her birthday. And considering her love of horses and riding, most of the gifts were horse themed books. :)


Lavender in pots were on the various tables as centerpieces. I purchased the lavender plants for our yard, and just bought a couple of $4 pots to allow them to serve dual purpose as decorations for the party.


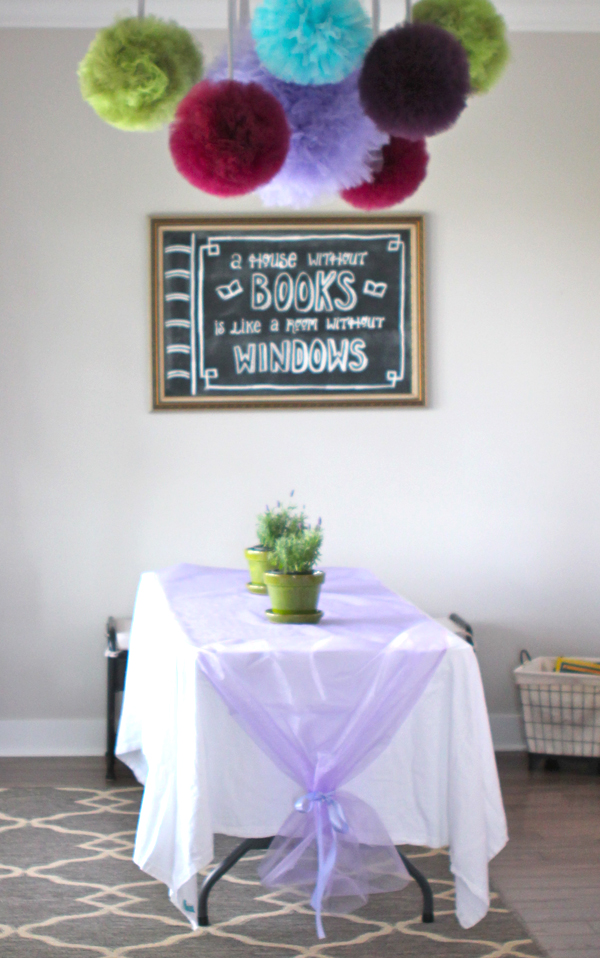
I decorated the chalkboard in the learning room to read "A house without books is like a room without windows." I made the chalkboard several years ago using a clearance frame from Michael's craft store, a scrap piece of MDF and chalkboard paint. 


I used book pages taped together on the underside as a table runner in the dining room. 


Bazzill paper books on ribbon make the garland into the dining room. Mini clothespins can be found here


I printed off this free heart illustration onto some 'printable fabric'  and put it into an embroidery hoop for a focal piece. 


Using the paper scraps from the book garland, I punched round tags with book-themed words: pages, literature, books, read, ex libris, etc. as drink labels for guests. Mason jar glasses and paper straws added a little whimsy.

Note: I cut the smaller paper scraps into strips and hole-punched one end to make additional tags. I put these, the twine spool, scissors and a marker in a jar to allow guests to personalize their own tags for their drinks. It also utilized as much of the scrap paper as possible. :)


I also made a 'book mobile' to add some color to the kitchen nook. This was made using a small hula hoop, ribbon, twine, and the same Bazzill paper books and mini clothespins I used for the garland.


As a final decoration, I sewed book pages into strands which I hung from the curtains in the dining room and learning room. Inspiration was found here

Sorry for the photo quality- many of the photos were taken the day of the party which was overcast and rainy, so lighting was not great. :(

Happy Birthday, Little Tomato! 

We love you.


Arrivederci Cardboard Play House

Tuesday, March 12, 2013

We will miss you, Up House. You have served us well.


Over three years ago Husband and I constructed a playhouse out of cardboard in our basement [original blog post HERE]. It has weathered three years of the cardboard door swinging open and shut, kids crawling in and out of the windows (no, this was not allowed, but it doesn't mean I didn't catch it happening a time or two...) and the every day wear and tear of getting jostled and bumped into by doll strollers and shopping carts. Ten months ago we moved to our new home. We cut the cardboard into manageable pieces and took it with us, trying to splice it back together in our new basement. But alas, it is finally time to say farewell to our well-loved cardboard house. I am really sad to see it go... but I must say, three years is an impressive lifetime of cardboard fun!

Bunny Parade

Sunday, March 3, 2013


I started knitting a few weeks ago. I have a tendency to really jump all-in with things. And I am apparently itching for Spring weather, because I have bunnies on the mind!

The first bunny pattern I used was for the bunny on the right, the one in the yellow dress. The (free) pattern can be found HERE on Ravelry, and the dress pattern can be found HERE.  I loved the dress, but was not satisfied with the bunny.

So I moved onto a quick little project, the small striped bunny. The (free) pattern, "Anything Animals" can be found HERE. This was a really fun pattern which also has pattern details for bear ears or pigtails for the knitted critter to become a plethora of little knit friends.

When that project was complete, I thought I would try my hand at making a pattern for a bunny, which is the big striped bunny in the middle.

Finally, I knitted the Belles and Beaus Knitted Hare pattern for the bunny on the left (pattern HERE). So far, she is my favorite. Not only is she super cute, but the pattern was awesome. The ears, head, body and legs are all knitted together, I didn't need to knit separate parts to sew together at the end. (Even though I sew, I detest hand sewing. I will go out of my way to machine-sew a project to avoid the hand sewing.) The Knitted Hare pattern includes a knitting pattern for the sweater, a sewing pattern for the dress, and a knitting pattern for some miniature carrots for her to carry along. My only criticism of the pattern is that the dress is WAY too big on my bunny. I will need to alter the pattern or make my own in the future.

Now that we are entering Spring, I am getting anxious to start seeds and gardening. Hopefully bunnies of the knitted kind will be the only ones I will contend with this season!

Smart Gardener

Monday, February 4, 2013

Last year, I stumbled upon a little website called SmartGardener.com

At first I was skeptical. I mean... it's free.

I took a shot and signed up.

I can unequivocally state that it was totally worth it. I recommend this website to everyone I have met who is interested in planting a garden. It is simple to use, contains a tremendous library of organic and heirloom varieties of edibles, and... did I already mention that it is FREE?

Here is a short(ish) synopsis of the program.

Step 1: Set Up Your Garden:

My garden was a bit complicated to set up. We live on an acreage now, and we built an 8'-0" deer fence around a 30' x 90' garden. This is not your standard size garden, so it was a tall order to set up the beds we were planning to plant. However, for a normal-sized garden, this would be a simple step of choosing the size of raised beds, in-ground beds and containers you plan on utilizing.

At this stage you input your zip code and note the orientation of your garden (which side faces north).

Step 2: Select Your Plants

Begin browsing the delicious smorgasbord of veggie and herb varieties in their expansive library. The plant list is tailored to what will grow in your climate, which includes a recommended planting time (for indoor seed start, transplant, and outdoor planting times) and an approximate harvest window. There is a tremendous variety of vegetables and herbs. Each variety also has a short description of the flavor and benefits to help determine which would best suit your taste (literally).

Once you have selected all of the vegetables and herbs you want to plant, you click back over to your garden layout.

Step 3: Create Your Smart Garden Plan

The garden plant list will now be populated with all of the plants you have selected in step 2. To create your garden plan, you can simply hit the "Recommend" button. This will generate you a recommended garden layout based upon the orientation of the sun and will maximize your square footage. However, if you want to organize your plants in any specific way, you can drag and drop your selections where you choose and customize your garden.

Your garden is set up to be a grid. Each square of the grid is a square foot. The program sizes the plant 'blocks' according to their recommended planting distances/ mature sizes.

Step 4: Weekly Checklist

Congratulations, you have your garden planned! Smart Gardener has generated a weekly checklist of what needs to be done for every plant in your garden. You can choose to be sent weekly e-mail reminders, and there is a journal section for you to make any notes which will help you in future seasons.

Another benefit of Smart Gardener is that as you add plants to your garden, it generates a shopping list for you. Smart Gardener has partner seed company websites which all carry organic and heirloom variety seeds. Your shopping list automatically moves your chosen seeds 'to cart' and if you want to buy your seed online, you can choose to "buy [seed company] items now." This takes you to the seed company's website... with all your seeds already in the cart. You don't need to manually add the seeds to cart yourself.

Add Ons:

Smart Gardener is free. However, they offer add on packages to expand the use of the website for additional needs. For example, I have added the berry package to my account to allow me to access the berry library and add it to my garden checklist. A few other example add-ons are as follows: Shade, Shapes and Successions. This allows you to even further micro-manage your garden by adding sources of shade (allows you to better plan where shade-tolerant plants reside), shapes to annotate paths, fences, trees and structures adjacent to your garden, and succession plantings.

Each of the add-ons are a one time fee, and vary from $2-$5.

So, take a minute to check it out! The site is well designed, offers helpful tutorials to assist through the set-up phase, and is an extremely helpful tool to start (or keep up with) your garden.

http://www.smartgardener.com/


My Sewing (And Knitting) Story...

Wednesday, January 30, 2013

I spent a lot of time with my grandparents growing up. My Papa would play checkers, backgammon and chess with me, and I would sit with him at his workbench in the garage and watch him carve. He was a woodcarver. He would visit with me about my day and explain to me what he was carving as his hands moved expertly across the wood. It was always the favorite part of my day.

My Nana would do puzzles with me and I would watch her sew. My Nana was an amazing seamstress. She could sew even the most complex pattern to near perfection. Every stitch was straight, every seam was finished.  She also knitted and crocheted, beautifully. I was always amazed at how nimbly her fingers worked the fabric or yarn as she was making something. 

Despite my interest in the art of sewing, I never really got into sewing when I was younger. I didn't have a machine and even if I did, I wouldn't have even known where to start. There weren't a whole lot of resources for the teenage audience at the time. Not to mention that it took a level of time, perseverance and patience that was overwhelming. 

My freshman year of college my Papa died. It was days before spring break, so I came home and stayed with Nana during that week. During my stay, sitting on the sofa together one evening, I asked her to teach me how to knit. She gave me a large pair of needles and showed me how to cast on, knit stitch and cast off. We practiced, sitting side by side, working the yarn. The rhythm of the needles was so calming. I think it was something we both needed at the time. 

My first knitting project was... unique, to say the least. I wanted to make a scarf. 
... I did not end up with a scarf. 

As a novice knitter, I didn't quite realize that as you cram those rows together on your 13" needle, they will not knit into a tight little 13" scarf (those of you who knit are probably already laughing...). Yes, novice knitters, count your stitches. Those tightly crammed stitches will expand into... well... not a scarf. My little mishap required that I buy a couple extra skeins of yarn (okay, maybe three or four...) and in the end, I created a slightly narrow throw blanket when I finally admitted defeat and cast off. Nana laughed with me when I told her about it, and said she admired my perseverance. I followed that project up with a couple of scarves (that actually looked like scarves) in my first year of college, but as classes got busier I put the knitting needles down to focus on school.

Fast-forward to after I had my daughter. I saw a sewing book, Amy Butler's Little Stitches, and impulsively bought it. I didn't have a sewing machine. I hadn't used one since middle school. But I knew I wanted to sew. 

I came home with my book and pronounced, "I am going to learn to sew!" to my husband. (Much like Gru from 'Despicable Me' walking into the room and pronouncing, "We are going to steal the moon!")

... I should insert here, how blessed I am to have a husband who just shakes his head knowingly, hugs me, and supports my ridiculous "I AM GOING TO  ___[fill in blank with crazy project]___" moments. 

I borrowed a machine and powered my way through the monkey laundry bag (pg 113 in Little Stitches). 

I was hooked. 

At the end of the project, I started researching sewing machines online. I read reviews. I went to every store in town and tested the different machines. I asked Nana about hers. We saved, and finally I bought my machine. I've been sewing ever since.

Last year Nana passed away. It was a very difficult loss for me. I wish I spent more time learning all she had to teach, but I feel so blessed that I was able to have her as long as I did. 

This week I picked up the knitting needles again. Nana knitted afghans for each of her granddaughters, and she gave me the extra yarn left over from mine. It was just a small ball of yarn left from that skein. I knitted a small doll-sized scarf for a doll I will make Little Tomato.

Yesterday I picked up a knitting book. 

Once again, husband gave me the knowing shake of the head as I declared, "I am going to learn to knit!" and began teaching myself to purl, rib and cable knit away...


Creative Slump

Friday, January 25, 2013

I've been in a bit of a creative slump. This time of year gets me so stir crazy. The holiday buzz is over, but it is still months away from spring weather and activity. I just feel like curling up with a book this time of year. It certainly doesn't help that our new puppy has kept me doggedly tired from her 3 am potty breaks!

Speaking of the new puppy... did you know that with some breeds of dogs, their ears can droop while they are teething? Earlier this week, one of Nala's ears began drooping. By the end of the week, both were drooped. Apparently this is not uncommon, but it was quite an odd sight for us. We have nicknamed her "Beaker" because it seems everyone (including me...) makes Beaker-like sound effects when picking her up. Well, that... and she has a Muppet-like quality to her.

Anyhow... while there have been few projects around here, during my January Craft Day I worked on a tutu for a gift. I made a 'Bobbing for Apples' tutu, which I designed a couple of years ago.

The photos below were taken by Laura Benitz Photography of my first 'Bobbing for Apples' tutu.


I have a few projects on the docket for this month, so hopefully I'll be posting some new projects soon! 

Holiday Hiatus

Friday, January 18, 2013

This past month has gone by in a blur, a season of family, friends, and festivities. We hosted and attended many a Christmas party. We had great friends over for the New Year. We were able to really test how efficient our home was built when the power was out for 12 hours during a snowstorm (it did well)... and we got a puppy!

We discussed a second dog for a couple of years.... and I may have periodically trolled Petfinder to see the dogs available in our area... But finally, in December, we stumbled upon a little dog that we just had to take home. She is a Lhasa-Poo (Lhasa Apso/ Poodle) and a little sweetheart. We adopted her from a wonderful rescue in central Nebraska, A Passion for Paws.


She is all puppy, with her snuggles, playful romping, and the evening wake-up call to go outside. I almost forgot how tired you become when you are regularly getting up at 3:00 am! 

So please excuse the holiday hiatus from posts. We are finally getting back into the rhythm of our days, with a new member of the family. :)


Proudly designed by | MLEKOSHI PLAYGROUND |