How to Make a House Scarf

Wednesday, July 5, 2017

Scarves are an excellent beginner's sewing project for kids. Little Tomato wanted to learn how to sew last year, so we had worked on a few exercises (which I will link at the bottom) and this was her first real project.

Gryffindor & Ravenclaw Scarves

Supplies Needed:

Scissors or Rotary Blade
Cutting Mat (if using rotary Blade)
Ruler or Measuring Tape
Pins

Fleece:
1 yd each color, two colors per scarf. This yields (5) scarves.

* Most fleece I have found is 58" wide. This yielded 5 scarves of each house (Gryffindor & Ravenclaw). Little Tomato and her friends are 9-10 years old, so this scarf length was perfect on the girls, at around 5'-6" in length. If you are making scarves for younger kids, you can get away with less yardage to yield shorter scarves.

Instructions:

Fleece is a great fabric for this quick scarf, as you don't have to worry about finishing ends. However, due to the stretchy nature of the fabric, it isn't the easiest to get perfectly straight cuts. You may find that you have extra (or not enough) fabric when you are cutting the fleece into stripes. Please note, the dimensions are forgiving. If you have any stripes that are noticeably wider, you can make these the end pieces that are cut into fringe or trim them down to match.

Step 1:

Cut the fleece lengthwise into 7" strips.  This will give you a total of (5) strips of each color.

You will have (4) strips that are 7" x 58", and one strip that is about 8" x 58". You can either cut this strip down to match the 7" size, or plan for this to be the end stripe that becomes your fringe.

Step 1: Cut Along Dotted Lines

Step 2:

* Fleece can have one side with a slightly different nap or texture than the other. If your selected colors have a front & back that don't match, you will want to make sure that you are pinning your fleece together 'right sides facing' on this next step.

Pin two colors together (ex. red & gold) lengthwise.

You can choose your seam allowances for your comfort level, but I would recommend at least a 1/4" seam allowance. Sew together.

Repeat this step, adding all of the strips in a color alternating pattern until all are sewn together. 
** If you chose to keep one strip wider (the 8" length), make sure that these are the first and last strips, as these will be the ends that you cut into fringe. See diagram below in Step 3 for illustration.

Once completed, this will give you a single piece of striped fleece, at 58"W x 2 yards (minus seam allowances) with a total of (10) stripes, (5) of each color.

*** MAKE SURE WHEN YOU ARE PINNING TOGETHER THAT YOU PAY ATTENTION AND HAVE ALL OF THE SEAMS ON THE BACKSIDE. I made this mistake and had to seam-rip out a full strip that had the seam on the front side. Not fun.

Step 2: Sewing Strips of Red & Gold together 

Step 3:

At the beginning of this step, you have a single piece of fleece that is striped.

Now you are going to cut the fabric widthwise, to yield (5) long striped pieces of fleece. See diagram below.

Step 3: Cut Along Dotted Lines.

On this step, you will have a little excess fabric, as shown above. You will find that, with the fleece salvage ends and the stretchiness of the fabric when you sewed the stripes together, this excess is much less than the illustration shows in reality. 😋

Step 4:

Now you should have (5) pieces of striped fleece that are 11" wide. 

Take one of these pieces and set the other (4) aside.

Fold the fleece lengthwise so that the finished (right) side is on the inside, together. 

Step 4: Fold Along Middle & Pin Long Side Together with Right Sides Facing.


Pin the long side together, making sure to line up the stripe colors as closely as possible. 
* All of your seams should be visible - the right side of the fleece should be folded together.

Sew along this pinned side. 
* Once again, seam allowances are to your preference, but I recommend at least 1/4". 

You are essentially making a tube, so that when you finish sewing the long side together and turn it right-side-out, all of the messy seams are inside the tube.

Repeat with the other (4) pieces of fleece until you have (5) completed 'tubes.'

Step 5:

Once you have completed all (5) tubes, turn them all inside out, so the finished side is exposed. 

If you want fringe, cut about halfway into the end stripes. I did not measure these, but just 'eyeballed' a general 1/4"-1/2" width for the cuts.

Voila, House Scarves!

Gryffindor Scarves


Ravenclaw Scarves

And for some fun sewing practice sheets for kids, check out the sewing machine practice sheets HERE from the blog "So Sew Easy!"  


How to Make a Magic Wand

Sunday, July 2, 2017

One of the first activities we did together as a family for the Harry Potter themed birthday party was to make wands. Details on wand-making are below!

Wands

Supplies Needed:

Wood Dowels or Chopsticks
Hot Glue Gun
LOTS of Hot Glue Sticks
Primer
Paint
Paint Brushes
*I favored sponge brushes for this project.

Optional:

Miscellaneous Beads

Instructions:

Wood Dowels: We used a couple of different sizes of dowels for this project. I would recommend visiting a craft store and looking at the gauges of dowels to determine which size(s) work best for you. OR you can use a variety of thicknesses by purchasing an assorted pack like THIS. The benefit of dowels is that they are typically sold in 12" (or longer) lengths.

Chopsticks: The benefit of chopsticks is that they naturally taper from a thicker end to a thinner end. The downside for chopsticks is that they do not come in a particularly long size, many are only 8"-10" long. HERE is a set of chopsticks that is a bit longer, at 9.75".

Optional Step:

Use a saw to cut a little bit off of several of the wands so they aren't consistently the same 12" in length. Take a light sandpaper and smooth out any splinters or rough edges from the cuts.

Step 1A: 

Heat up hot glue gun and begin adding glue to the dowels. You can spiral up the dowels, or drips, or thicken the wood by completely covering it in glue and building it up thicker as it cools by adding additional layers. This is the fun part. We bought a couple of packages of dowels and did several at once. The glue cools relatively fast, so you can lay the wand down to finish cooling as you move on to additional wands.

Wands in the Making: Glue Application.

Step 1B: 

Optional beads can be added to the wands to give additional thickness or unique texture. We added some wood beads around the handle side of some of the wands to make the handle thicker. We added seed beads to some of the wands to give it a more rough texture. We added some decorative beads to the ends or handles of the beads to stay exposed as decorative elements. We essentially found old beads from our craft stash and repurposed them for wand-making! 

Step 2: 

Once the glue has cooled and you have finished adding glue layers, you can begin to prime the wands. We had purchased a single quart of primer @ a home improvement store, and used it for every single project of the party, and there is still primer to spare.

Priming took a couple of steps. We primed one side of the wands and then used mason jars to hold the wands upright as that side dried. Once dried, we primed the other half and repeated this step. 

You can see in the photo below that we had filled the mason jars up with old coffee beans to help the wands stand upright so we could fit multiple wands in each jar without them touching and sticking to each other. 

Wands in the Making: Glue Applied & Primed Steps.

Step 3:

Painting, layer 1. We purchased a brown craft paint, black craft paint and had a grey craft paint. We used the brown by itself on a few wands, added black for a darker brown on a few wands, and grey on a few wands. This is getting the base color onto the wands. 

We repeated the two-step process with mason jars that we did for the primer to paint each half of the wand.

Wands in the Making: Base Paint Layer.

Step 4:

The final step was to add a layer of gold to highlight the details on the wands. I took a sponge brush and got it a little damp to dilute the potency of the gold color (you can do this by running it under the faucet and then squeezing the excess water out). I then lightly brushed the gold paint over the wands. This will only apply gold on the thickest three-dimensional parts of the wands. We also did this with black (instead of gold) on a few of the light brown wands to make these darker and more 'aged'.  Little Tomato found a few metallic paint colors she liked and added accent colors on a few wands as well. Have fun adding depth and character to the wands, so the color isn't so flat. 😊

Completed Wand with a Wand Tag.


SaveSave

A Very Harry Birthday Part 5: Honeydukes

Monday, June 26, 2017

This is Part 5 of the Harry Potter Party series. 

"Part 4: Class Lessons & the Troll in the Dungeon" can be found HERE.
"Part 3: Great Hall Sorting Ceremony" can be found HERE
"Part 2: Diagon Alley" can be found HERE.
"Part 1: Invitations & the Entry to Platform 9-3/4" can be found HERE.

After cake and presents, the final part of the party was Honeydukes.

When I was looking at photos of the Honeydukes shop for ideas, the Bertie Botts display shelf really drew my attention. I had a fairly big piece of insulation foam left from making the signs, and decided that I wanted to tackle the display as a feature of the Honeydukes sweets table.

Details on how to make the Bertie Botts Display can be found HERE.

Honeydukes Table

I purchased a few apothecary jars and found miscellaneous labels online. I printed the labels on cardstock and used clear contact paper to mount them to the jars (this way, they could be easily removed without requiring me to scrape adhesive off the glass jars). 

The Fizzing Whizbees were Satellite wafers (found HERE).
The Acid Pops were sour apple suckers (found HERE).
The Droobles Best Blowing Gum were generic gumballs.

Close up of Honeydukes Sweets.

The Licorice Wands were Twizzlers.
The Ton Tongue Toffee was old fashioned hard toffee.
The U No Poo was wax bottle candy (can find HERE).

Close up of Honeydukes Sweets.
The Bertie Botts Every Flavored Beans was a mix of miscellaneous flavored Starburst Jellybeans. We bought bags of several different flavored beans (Original, Tropical, Fave Reds, Sour, Crazy Beans,  and Ice Cream) and mixed them together in a big bowl. We put them into 'snack bags' and stapled a label along the top.

Bertie Botts Beans.

The girls traded in their bags of Gringotts gold for Honeydukes sweets at the end of the party.

And THAT is the end! 


A Very Harry Birthday Part 4: Class Lessons & the Troll in the Dungeon

Monday, June 26, 2017

This is Part 4 of the Harry Potter Party series. 

"Part 3: Great Hall Sorting Ceremony" can be found HERE
"Part 2: Diagon Alley" can be found HERE.
"Part 1: Invitations & the Entry to Platform 9-3/4" can be found HERE.

After the Start of Term Announcements by Dumbledore, the classes began!

Potions Class

Each of the students were given a potion page as they entered the class. This page listed their potion ingredients, required equipment, and instructions.

Potions experiment instructions.

As the students filed into the Potions classroom, we had 'Professor Snape,' my brother, [edit: my Totally Awesome Brother, per his request 😜], read his speech (excerpt from Harry Potter and the Sorcerer's Stone - copied and printed onto a page for him to read, ex. "I can teach you to bottle fame, brew glory and even stopper death...").

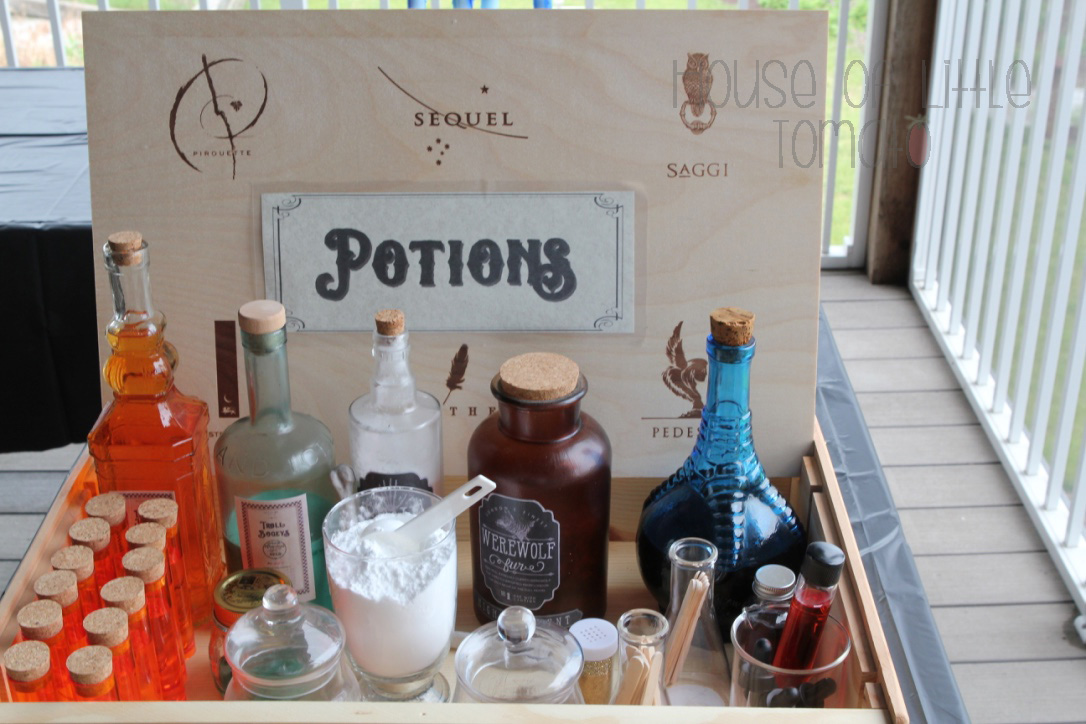
The Potions class was held on our deck to allow for an easier cleanup. For the potion activity, we had created various potion bottles of ingredients and put additional jars and bottles of the ingredients for the students to use in their class.

Potions box and ingredients.

Each student each received their potion ingredients and began following the directions on the instructions.

Potions class.

The active ingredients of the potion were vinegar and baking soda. The final result was the cauldron bubbling over. A really fantastic result of the sequence of steps was that there was a plastic spider that was added to the cauldron before the bubbling reaction and in many of the cauldrons, the plastic spider began to escape (or appear to 'crawl') out of the cauldron when it bubbled over. The students loved to see their spiders crawl out of the cauldrons.

Cauldron bubbling over.

One thing I would change in the future would be to prepare more 'pre-measured' portions or smaller communal containers of ingredients to spread amongst the kids. As the kids were spread out across two tables, several of them had to wait for the 'dragon's blood' and 'warewolf hair' ingredients to be passed around in order to continue with their potion.

Charms Class

The students left Potions class, and went down to the basement for our Charms class. Each student grabbed a feather from the desk and sat down with their feather, course book, and wand.

Feathers for practicing 'Wingardium Leviosa.'

As professor McGonagall, I used THIS magic trick to make my feather levitate. Once I showed the class the spell, they each set to practicing the spell themselves. They referenced the page in their course book and the wand motion on the chalkboard to practice.

Charms chalkboard.

After the girls practiced for a few minutes, my brother (as Professor Quirrell ran into the room and screamed, "TROLL, IN THE DUNGEON!!!" and collapsed on the floor. 

I asked the students if they wanted to be dismissed to their dormitories or fight the troll. 

They ALL chose to fight the troll. 😋

Troll in the Dungeon

We took the girls out to the patio where we had a troll piñata. I'll be perfectly honest, I had zero interest in making a piñata. I was lazy and ended up finding a Teenage Mutant Ninja Turtle piñata on Amazon for cheap and just covered up the turtle details with Modge Podge and green tissue paper we had on hand, and used a black permanent marker to draw some face details.

We asked the students which spell was used to take the club from the troll to defeat him (the Wingardium Leviosa spell they just practiced was the answer).  Then each student had a turn to hit the troll with the club. They used their scarves as blindfolds.

Defeating the troll in the dungeon.

Once the troll was defeated, the prizes inside the troll were bags of Gringotts gold for each girl.

Bags of Gringotts gold before they were stuffed into the troll piñata.

After we defeated the troll, the students returned to the Great Hall to celebrate with birthday cake and open presents.

The cake was designed to look like Hagrid's birthday cake for Harry, and made by fabulous Whisk & Measure bakery.

Birthday cake.

Next up, the final installment of the series, Part 5: Honeydukes...!


SaveSaveSaveSave

A Very Harry Birthday Part 3: Great Hall Sorting Ceremony

Saturday, June 24, 2017

This is Part 3 of the Harry Potter Party series. 

"Part 2: Diagon Alley" can be found HERE.
"Part 1: Invitations & the Entry to Platform 9-3/4" can be found HERE.

After the kids passed through the brick wall, we were ready for the 'Sorting Ceremony.' 


Great Hall

A quick 'shout-out' to my mom who painted the 'Fat Lady' for Little Tomato for her birthday. After passing through the brick wall, this showed that the kids were entering Hogwarts. This is an OIL PAINTING. She doesn't mess around. 😋


The Fat Lady.

Once we passed the Fat Lady, I welcomed the kids to Hogwarts. I read Professor McGonagall's speech about the Sorting Ceremony and then brought out the Sorting Hat and chair for the girls to be sorted.

I found the various speeches we used in the book, typed them up, and printed them on paper for each of the adults to read. The Professor McGonagall speech can be found HERE too.

For the Sorting Hat, we played the audio from our Harry Potter audiobooks narrated by Jim Dale. We used Husband's digital recorder from college (which, amazingly, still works!) and recorded the Sorting Hat Song first. 

We then created a 'Class Roster' with the kid's names in alphabetical order and called them up one by one to get sorted. Track 1 on the recorder was the Sorting Hat Song. Tracks 2-14 were each of the kid's houses shouted out by Jim Dale (as the Sorting Hat).

So... I don't think I have mentioned the little party hiccup yet. 

We had a storm hit our area the night before the party. After a late evening spent in the tornado shelter, our power was still out the next day when the kids started arriving. With our house on a well, this meant no functioning sinks or flushing toilets. The refrigerator was not working. No lights. No audio system. Eek! 

We stocked up on bottles of water and wet wipes. We brought in our cooler and bought more ice bags. We used a bluetooth speaker to play music for a short time, but with our cell phone batteries dying, it only lasted until we started the Diagon Alley activities. 

We were luckily still able to play the Sorting Hat Ceremony through the digital recorder,  but I was really disappointed that we weren't able to run it through our audio system - the volume was not ideal on the recorder speaker. 


Sorting Ceremony

For those interested:

Harry Potter and the Sorcerer's Stone, Chapter 07B track, 1:58 - 3:23 - Sorting Hat Song
Harry Potter and the Sorcerer's Stone, Chapter 07C track,  0:43/0:44 - Ravenclaw!
Harry Potter and the Sorcerer's Stone, Chapter 07C track, 2:36 - Gryffindor!
Harry Potter and the Sorcerer's Stone, Chapter 07C track, 4:26 - Gryffindor!

We only sorted the kids into Gryffindor & Ravenclaw. We went back and forth on whether we would have the time or fair weather to play quidditch. To be safe, we designed the party for two houses so that we could add quidditch to our activities if we ultimately decided to add it.

Once the kids were sorted, they received a scarf to wear at the party in their house colors. Little Tomato had expressed an interest in learning to sew, so this was a really fun and easy beginner's sewing project for her to practice sewing. We kept these for us to use at future parties.


Sorting Hat chair and house scarves.

We had the dining room table set with red & gold and blue & silver plates for their houses. Once the kids were sorted, they sat at the table based on their house colors. 


Gryffindor & Ravenclaw place settings @ the table.

We then had Dumbledore enter the room to give his start of term announcements (and, of course, his iconic "Nitwit! Blubber! Oddment! Tweak!" speech). 


Dumbledore giving his start-of-term announcements. 

And a quick closeup of my Hogwarts crest. This was also made of insulation foam. I sketched the design onto the foam, used a heat Xacto tool (like THIS one) to carve out the design, and sprayed it with stone-effect spray paint (like THIS).

Hogwarts Crest

After the start of term announcements, it was time to begin classes! 

Next up, Part 4: Class Lessons & the Troll in the Dungeon


A Very Harry Birthday Part 2: Diagon Alley

Saturday, June 24, 2017

This is Part 2 of the Harry Potter Party series. Part 1 can be found HERE.

Diagon Alley

Our house has an office directly off the front entry, which we converted into Diagon Alley for the party. On a typical day my office desk is in this room, but we moved it out to make room for the 'curiosities cabinet.' Little Tomato's desk, an old schoolhouse desk from my grandmother, was kept in the room as a prop. The less to move, the better! 

We emptied and moved a couple of bookshelves for 'store shelves' and moved a tall cabinet into the room as a 'curiosities cabinet'  [A big shout out to Husband and my brother for doing the heavy lifting!]

Diagon Alley

This was a 'one stop shop' for school supplies.

As the kids arrived to the party, they gathered in Diagon Alley and had fun checking out the potion bottles, creatures, equipment, and curiosities until the rest of the kids arrived. 

The curiosities cabinet was filled with miscellaneous items. I  made the mandrake out of clay and painted it. I found the mandrake sketch page online and printed it on cardstock. Potions bottles were made from old perfume & liquor bottles collected from friends and family. The brass scale was found at a secondhand store. Plastic fake coins were on display as 'galleons'... and so forth. 😋


Curiosities cabinet, with doors open.

Close up photos of the cabinet items:

Cabinet Detail.

Cabinet Detail.

Cabinet Detail.

Turning the corner to the 'Wiseacres Wizarding' shelves, I took old books and mode-podged Harry Potter book covers onto them. I printed a picture of Gilderoy Lockhart and mounted it in a frame.

Wiseacres Wizarding Equipment shop shelf.

... I made a Monster Book of Monsters and a Bowtruckle...

Monster Book of Monsters, and a bowtruckle peeking out behind books.


Then there were the course books and feather quills.

Each student received a course book, quill, and a mini cauldron in Diagon Alley. The course book was a combination of a cover I designed, a spell book download I purchased on Etsy, and a potions section that I designed. I printed them on parchment paper at home. The feather quills are ballpoint pens wrapped in white duct tape and a white feather.  The students got to take home the course book and pen.

Course books and feather quills for the students.

We had a lot of fun over the winter making various potion bottles. Once we added labels, we filled the bottles with various items, depending on the label's description. A few were just food coloring and water, however we got a little more creative on many of them. The 'Horn Dust of the Unicorn' was flour and glitter. The 'Skele-Gro' was a white glittery slime to give it a thicker viscous look. The 'Crushed Horned Slugs' was my husband's favorite to make, where he added corn syrup, food coloring and the rubbery heads of fishing bait (the long slimy green ends of the bait were made into Gillyweed in another bottle).

Potions bottles.

The old schoolhouse desk was set up with "A History of Hogwarts" book, quill, and a couple of pieces of extra parchment paper.

I printed out a quidditch graphic and mounted it on a scrap of insulation foam I painted black and mounted it onto the wall behind the desk.

School desk setup.

Finally Ollivanders!

The Ollivander's sign is made of insulation foam. I sketched & cut out the "O" wand logo and mounted it on a second piece to make it three dimensional. Cup hooks are used to hold the wands mounted to the sign.

We made all of the wands as a family during the winter, over a couple of weekends with wood dowels, hot glue & old craft beads.

Ollivander's Wand Shop

In the Ollivanders corner, I had a mannequin set up with a robe and scarf (the robe was an old graduation robe that we had acquired at some point when my parents were clearing out their storage room) next to a metal lantern stand (Hobby Lobby clearance find). Inside the lantern stand, we had a single LED candle. This candle is remote control operated. 

Mannequin with 'school apparel' and lantern used for the wand selection.

After the students had received their quill, book, and cauldron, they were lined up at Ollivanders. Each student was handed a wand and told to wave it at the candle and to say "LUMOS!" If the candle did not light, the wand did not choose them. If the candle lit up, the wand had chosen them. Some students had the candle light up immediately, but others were 'tricky! What to do, what to do...' and had to wave three or more wands before they found their match. This was a HUGE hit. Once the wand chose them, I waved my wand and said "NOX!" and the candle turned off for the next student's turn.

Husband was very discreet with the remote control, and the girls could not figure out how it worked. The candle was also a color changing LED, so would turn different colors from girl to girl. 

Once the wands chose their witches, the girls were ready to go through the brick wall to Platform 9-3/4

Time to go through the brick wall to Platform 9-3/4 and onto Hogwarts!


Up next, Part 3: Hogwarts Great Hall Sorting Ceremony...

SaveSaveSaveSave

A Very Harry Birthday Part 1: Invitations & the Entry to Platform 9-3/4

Friday, June 23, 2017

Harry Potter hit our house big time this past year. Little Tomato finished "Harry Potter and the Sorcerer's Stone" in August of 2016 and immediately proclaimed that she wanted her next birthday to be a Harry Potter party.

Decision made in August... birthday in June.

Over the next few months, she DEVOURED all 7 books. She commandeered Dad's old CD player to listen to the audiobooks (Jim Dale, you're amazing), and still listens to them almost daily.

As we read the books, we did Harry crafts. We made wands together as a family, practiced sewing by making house scarves, made 'potion' slime, decoupaged potion labels onto bottles, molded creatures out of clay, and sponge-painted a brick wall.

Her excitement for a Harry Potter birthday did not waver, and there was no shortage of content for me to start planning my most ambitious [read: crazy] party to-date. 10 months is a lot of time to go overboard, and I'm already prone to going overboard.

We decided that her party would only be 'first year' for a couple of reasons. Though many of her classmates had also 'caught the Potter bug', many of them have not yet gotten past the first book or two. There are also SO MANY excellent details written by the fabulous J.K. Rowling, that it was easier to focus the projects and party activities along the storyline of one book.

My blogging has been stagnant for the past several years, so I have not written any posts on the projects you see in the pictures below. I'll try to follow up my party posts with individual project posts, but you're welcome to leave inquiries below on any specific parts. 😊


A huge benefit of planning a party like this months in advance is that you can take your time acquiring materials. This is a significant cost savings.  I have included some ideas below, if you are interested in planning a HP event of your own:

Holiday clearance bounty.
Though we already had some Halloween decorations that could be used for the party, we made a wish-list of items that we wanted to add (mini-cauldrons for the potions experiment, witch hat, broomstick, etc.). We hit the clearance aisles after Halloween and were able to find great deals; 6 packs of mini cauldrons for a quarter, witch hats for a dollar, a giant toad for two dollars, etc.

As we got closer to the party date, we found jelly beans and candy on clearance after the Easter holiday. Printable labels and plastic baggies made these inexpensive realistic-looking Honeydukes treats.

Ask friends to keep an eye out for supplies.
Many of the supplies you'll want are free if you ask around. We received boxes of empty perfume & bubble bath bottles, empty unique wine & liquor bottles, old books, and picture frames. We found free potion labels and graphics that we were able to print at home and turn these into the magical Diagon Alley wizarding supplies.

Know if your local party supplies stores have any special events.
One of our local party supplies stores has an annual "Bag Sale" where you can fill a bag FULL of any clearance items for $10- and there is no limit to the number of bags you fill! I was able to score the LED flickering flame candles, LED color-changing plastic ice cubes and the colored melting wax candles from this event for a serious steal.

Invitations

The party invitation was an acceptance letter to Hogwarts which included a ticket to Platform 9-3/4. I was able to find the Hogwarts crest, Minerva McGonagall signature, and misc. owl stamp files online, and designed the invite & envelope in Photoshop. I printed the invites at home on parchment paper, and printed the owl graphics onto the kraft paper envelopes at home as well. 


 We hand-delivered the invites to the girls via 'owl post'. I blew up a few white balloons and drew owls on them for delivery. The image below is the collection of owls ready to deliver their packages.


Approaching the House

Approaching the house, we had an outdoor signpost with an owl perched atop, and a 'school trunk' near the front door.

The signs were wood boards I cut into arrows, painted, and mounted to a pole. The owl is a decoy/ scarecrow.


To be perfectly honest, I filled the trunk with dark laundry to make it look full, draped a robe over the edge, and piled some old ratty books on top of the laundry - topping it with "Quidditch Through the Ages" & "Fantastic Beasts & Where to Find Them" to make it look like a trunk full of wizard clothes and school books.


So... signage. 

I built theater sets in high school. One thing I learned from that experience: insulation foam is amazing. It is lightweight, easy to cut (boxcutter or foam-cutting tool), and inexpensive. A 4' x 8' sheet will cost around $12 -$25 depending on where you buy it and the thickness of the foam. 

For the party signage, I bought a total of (2) sheets of foam and made every single indoor sign AND the Bertie Botts display out of the two sheets of foam, a single quart of primer and misc paint colors.

The Platform 9-3/4 and Leaky Cauldron signs are made of insulation foam.


I had purchased three canvas drop cloths and converted them into curtains hung on tension rods to close off the 'Great Hall' from view, and to make the brick wall onto Platform 9-3/4.

For the brick wall, I also purchased one of those magnetic mesh screen doors (not THIS one, but a similar one on clearance at our local hardware store for $8...) and sewed it into the center opening. I loved the idea of the brick wall closing back up behind the students as the walked through it, and luckily it worked as planned.

It was an awesome effect.

'Hogwarts student' walking through the brick wall.

Brick wall closes back up behind students via magnetic closure.


Next up, Part 2: Diagon Alley...


SaveSave
Proudly designed by | MLEKOSHI PLAYGROUND |