Showing posts with label Magical Alley. Show all posts

Magical Alley: Slug & Jiggers + Potages Completed + New Owl Post!

Thursday, May 29, 2025


Slug & Jiggers + Potages were completed with the connecting signage, and false door (which was made out of scrap plywood, trim, and a spare door knob). Once complete, we moved onto the Owl Post! 

Owl Post

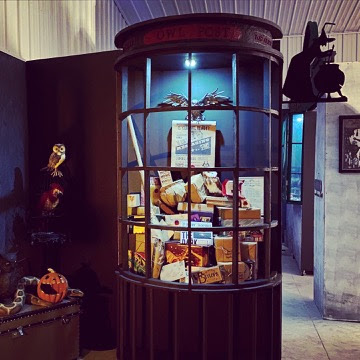
The Owl Post window is a half-round window display, fashioned after the windows in the WW. We used the same dowel base, but taller to accommodate our needed window height.


Our packages are a mix of kraft paper wrapped empty boxes and LitJoy crate boxes for the color and design pop to keep the window dynamic. We are continuing to add packages, but have at least set up a base of colorful post.


We also needed to add a feature to the display to give a focal point that wasn’t just wrapped packages. I was able to find an inexpensive wall-mounted resin owl, which I spray painted metallic. I added small magnets to the feet to allow me to attach interchangeable messages.


The message was printed on large format paper, and wrapped around a recycled paper towel roll for the scroll effect. I added a scrap of ribbon and a wax seal to the bottom for a little fancy (and to add weight to keep it from curling up).


Once we completed the construction of the Owl Post side of this display, we turned our focus onto the backside… my personal favorite window in the alley… Spindlewarps!


Construction is in progress, and will be shared in the next post.

Magical Alley: Apothecary & Potages

Thursday, May 29, 2025


The first post on the magical alley detailed the Flourish and Blotts mobile display [HERE]. Once this project was significantly completed, we began working on the Slug & Jiggers Apothecary & Potages windows that would face Flourish & Blotts across the alley walk.

Apothecary & Potages Layout:

After reviewing photos of Diagon Alley architecture and shop options, we settled on the layout in the image below. While the original shop configuration was a Wiseacres Wizarding Equipment & Potages Cauldron Shop, we decided to concentrate on Slug & Jiggers Apothecary and Potages Cauldron Shop.
In our years of hosting wizard Halloween parties, we had already accumulated a large collection of potion bottles and cauldrons which would fill the window displays without adding cost. The Wiseacres window display focuses on a collection of celestial and astronomical gadgets that would have taken significant time and materials to fabricate.

Once again, I took to SketchUp to work out the general dimensions and construction to calculate materials needed. This was a basic ‘blocking study’ that included major structural components. I did not waste time detailing out the model.


The Potages window display is a topsy-turvy stack of cauldrons, so the plan for this window display is to utilize the plastic cauldrons we have accumulated over the years. We have plans to make the top cauldron ‘self stirring.’


The Slug & Jiggers Apothecary windows are full of baskets of herbs and potion bottles, but there isn’t a feature element drawing attention to the display. However, there is another window in Diagon Alley (leading into Knockturn Alley) that is for the shop “Potions for All Afflictions.” This window features “Skelegro” with a whimsical character sitting in a cauldron. A potion bottle hovers magically in the air above his head, pouring the potion into his gaping mouth. I loved this window display and was bent on making it my Slug & Jiggers feature. My husband was skeptical, but knows better than to doubt my crazy ideas.


*The reason we didn’t make the window a ‘Potions for All Afflictions’ storefront is that I wanted the pop of the ‘Slug & Jiggers pink’ against the Potages charcoal facade. I wanted to make Diagon alley full of color and whimsy, in contrast to the dark and dreary Knockturn Alley shops.

Building Begins:

I drew up a sketch of my idea for the window to get a feel for the color combination and layout, and then we got to work building!


Husband and I boxed out the frames, and I ‘dirtied up’ some hardboard faux stone panels to make them look old and dingy.


We painted the basic components and began to assemble the window framing. The apothecary also included shallow shelves to display potion bottles.

SkeleGro Feature:


The next component to include was the feature potion drinker. I started with a scrap of insulation foam as the body and a couple of additional smaller scraps for the arms. I used a pencil to hand sketch the character and then cut the foam to shape.


Once the shape was cut out, I used acrylic paints to paint him. I used a picture of the original and my drawing as references to complete the details.


The arms were two separate pieces of foam, which gives the character a more 3 dimensional appearance. I used a screw and bolt (with washers) to join the arms to the body. They were spray painted matte black to blend in with his suit jacket.


Once the character was completed, I used a smaller scrap of foam to make the potion bottle which would be floating above him.

On the original character, the bottle appeared to be pouring the potion into his mouth. I wanted to achieve the same effect. To do this, I purchased a clear plastic tube from the plumbing department and covered it in hot glue ‘drips’ to give it more of a liquid-flowing appearance. Once the glue was cooled, I fed a color-changing LED strip light through the tube. This tube was adhered on the backside of both the bottle and the character to connect the bottle to his mouth.

After some time, the tube began to slacken and droop, so i strengthened the tube by feeding a wood dowel through it as well, to give it structure. The glue drips on the clear tube give it enough of a haze to conceal the light strip and dowel hidden within it.


While the Slug & Jiggers window display was underway, the Potages cauldrons were getting coats of spray paint to make them different metals (copper, pewter & silver). These will be stacked and displayed in the window soon, but I am still working out if I will add aging or ‘bubbling over’ on them to give the display some additional character.

The next step is to detail out the faux doorway between the shops and to complete and hang the sign above the storefronts and add molding/trim details to finish it out…


Magical Alley Begins

Thursday, May 29, 2025


We did not host our annual Halloween party in 2020 due to the pandemic. However, our summer was occupied with building a shed workshop instead of our usual puzzle planning. With the shed newly completed, our Halloween props and decorations have migrated into storage out of the house and into the shed. {Phew!}

This spurred a conversation of hosting the annual Halloween game out there instead of our home… which in turn allowed me to go full-out-crazy on additional ideas. If they aren’t squeezing into my living space, I can be much more ambitious…

We are now building a magical alley for our party. When a trip to the grocery or hardware store is a treat, it is a creative outlet that is keeping us busy and sane.


Husband and I brainstormed how we wanted the space to work, and what we wanted to include. We had already created components for Knockturn Alley in previous years, so we worked out how to utilize these pieces in their new home. As the space is used for a game, we looked for a balance of storefront windows to observe as well as a shop to explore and rummage through. The Halloween game is part of the fun!

Flourish & Blotts Storefront

Once we created an idea of components, I began building a few quick Sketchup models of components to get approximate sizes and materials lists determined. The first piece I worked out was the Flourish & Blotts window display. This wall is a divider between the storefront and shop interior, so both the front and back were to be considered. Since we are NOT building structural walls in this space for a Halloween party, the wall partitions are simply 4′ x 8′ x 2″ insulation foam panels. We designed 2×6 wood feet supports to hold them upright for a quick and easy separation of space. A cap overlays the top of the panels to help keep them aligned together and display signage.


I did not want a flat wall of shop fronts. Part of the fun of Diagon Alley is the three dimensional and dynamic shops. The Flourish and Blotts storefront would be the most challenging, as it is in the middle of the room, without wall support, and would need to be mobile and easy to disassemble. While the insulation panels provide the flat wall panels, a three dimensional element needed to be included.
Last year, I scored a cheap base cabinet. I bought it with the idea of using it as the basis of a mobile window display. The idea was to mount it onto casters and use it as a base to build upon – utilizing both the front AND back of it as a shop front window AND an interior shop display.
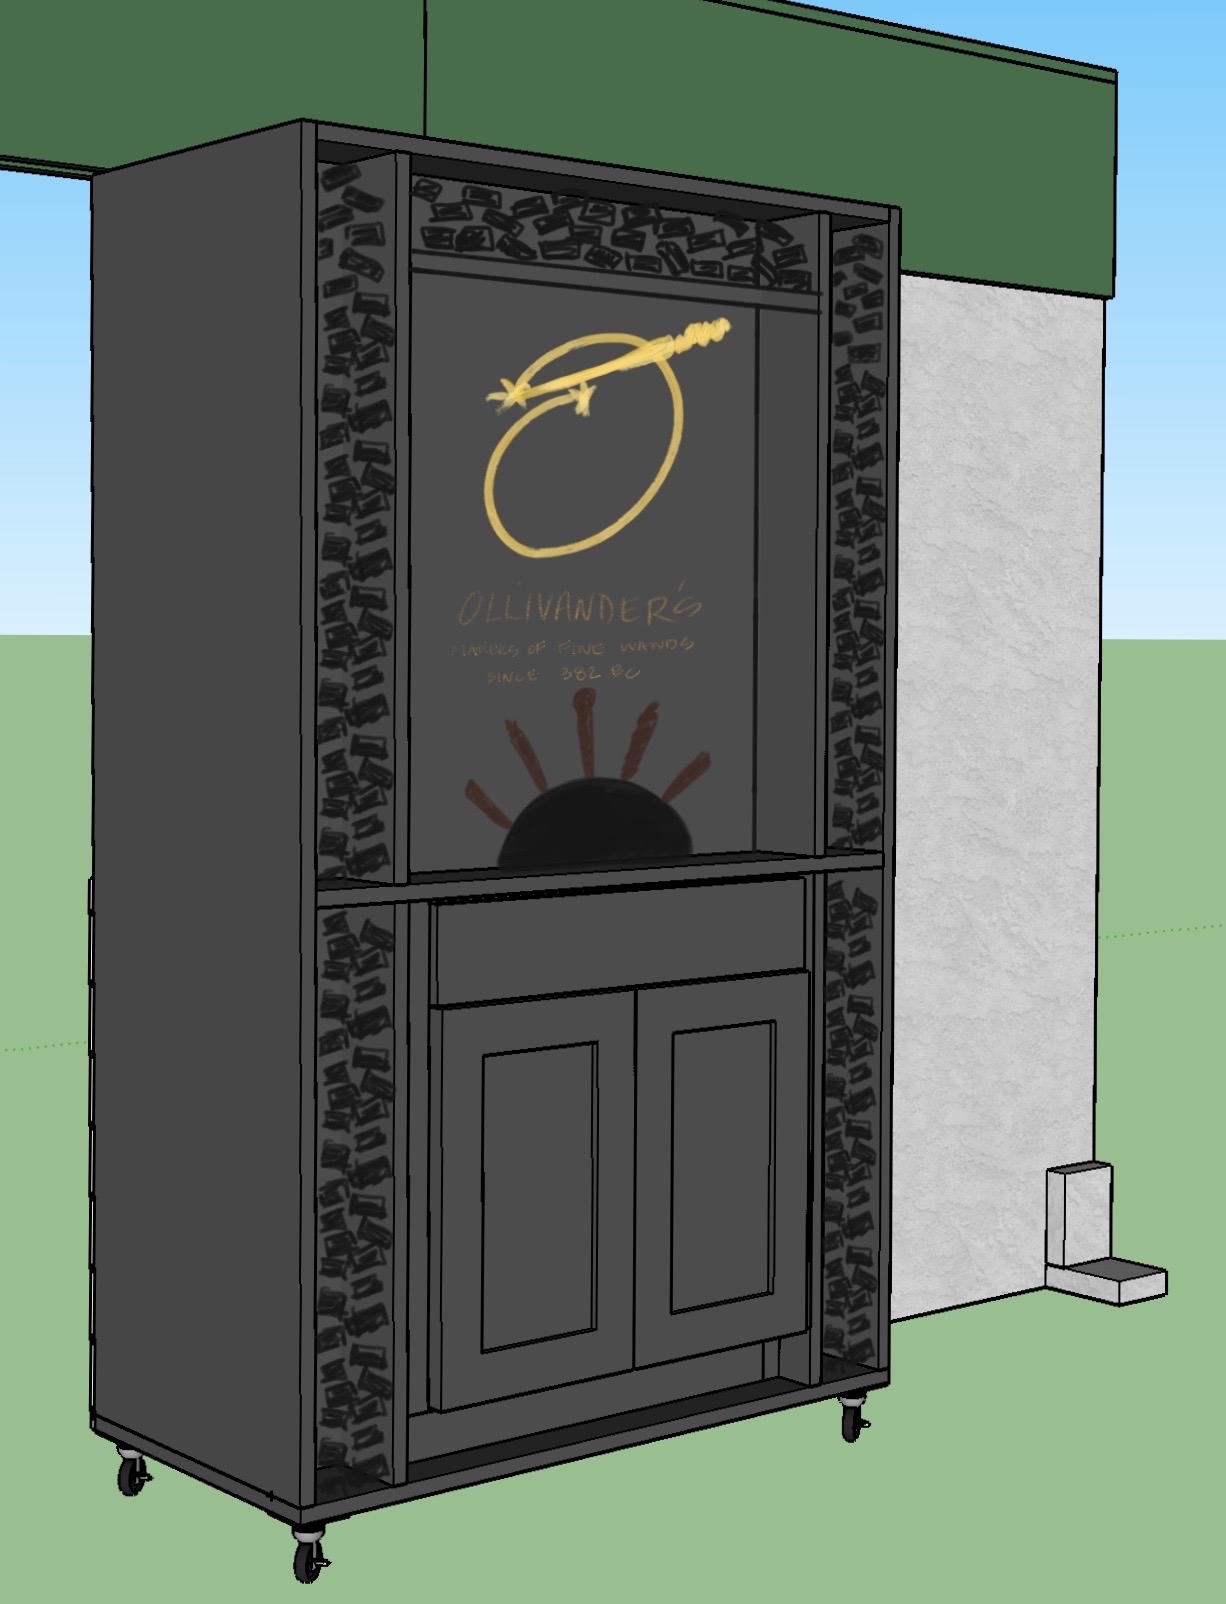
The shop interior is a ‘catchall’ magical shop, where we will display all magical props – books, robes, potions, etc. One feature I wanted to include on the shop interior was an Ollivander’s wand display. Ollivander’s, with its cattywampus shelves and dusty wand boxes, is the epitome of wizard shopping. The back of this cabinet was designed to be this display.


Adding Details: Ollivanders Interior Shop Side


Once the paint was dry, it was time to start adding details.
Using scraps of wood from building the shed, we cut 2×4 ends in random sizes. These were spray painted red, blue, and yellow and then mounted in a cattywampus manner to backer boards cut to fit in the side openings of the wand display.


Wand labels found HERE were adhered to the painted wood pieces. After all adhesive was dried, a light layer of dark spray paint was misted over the ends to give them a dusty, aged look. The completed boards were then screwed into the side and top openings of the wand display. Even though these elements are only a 2″-3″ deep, they are perceived to be full depth wand boxes in shelves…. like magic!
I took my foam Ollivander’s Wand sign that was made for an earlier party, cut down the size, and added a frame using leftover molding and gold spray paint. This was mounted in the center as the display signage. A wand display will be added to showcase a few wands, it is on the ‘to do’ list!


Adding Details: Flourish & Blotts Exterior Shop Side


Onto the exterior widow display side! The front interior window is hinged to allow us to access the display and change as needed.

Once again, I played with the perception of depth to make the window appear deeper than it is in reality. Using scraps of insulation foam that were too small for additional signage or props, I printed off magical book covers and wrapped the foam in a cover. The covers are cut short, as the depth of the ‘books’ are really only 2″-3″ deep. The books were stacked on top of the shelves as well, to give the ‘bursting at the seams’ feel of the wizard shops. Since these are just paper-wrapped-foam scraps, this also keeps down the weight of this mobile unit.


The window display really needs to include feature elements to make it pop. There are two windows flanking the doorway on the original shop. One window features the Gilderoy Lockhart ‘Magical Me’ book advertisement, the other features a cage of ‘Monster Book of Monsters.’
As we are constrained by space, we have a single window display. We decided to make both of these features in our window. We already have a ‘Monster Book’ that I made as a prop for a previous party, so we set out to construct the cage next.


Once again, using scraps of wood (from constructing the windows), we assembled the cage. The cage bottom utilized a scrap of MDF board that was left over from another project. The original cage was made of metal with studded caps on the intersections of the straps, so I grabbed some plastic craft jewels I had in my stash and glued these onto the wood pieces to give it detailing. The whole cage and base was then spray painted metallic black.


Another great detail of the ‘Monster Book of Monsters’ display was the pile of shredded pages that was underneath it. These books are clearly caged for a reason, they are eating other books! Little Tomato joined in on the fun and helped me shred a book for the cage carnage. We used an old, stained, outdated German/English dictionary for this purpose and hand-shredded the pages to create uneven and un-uniform scrunched up strips. This was spread over the bottom of the display, where the messy eater was caged.


The final project for this window display is the Gilderoy Lockhart book advertisement. This is a framed poster of Gilderoy. As wizard photography is not static, but moves…. we have plans for this. It is a project in our list that will be added to this post once completed!

Proudly designed by | MLEKOSHI PLAYGROUND |