Magical Wall Mural

Thursday, May 29, 2025

Our ‘spare bedroom’ in our house has changed use over the years we have lived in our home. Initially it was a craft room where Little Tomato and I would do crafts and I would work on art projects. As we began to finish out our basement, we converted the room to a playroom that held all of her toys. Now that Little Tomato has grown out of toys, we are giving it a final upgrade.


I considered how we would use the room going forward. While we don’t have a guest bedroom, and it would be nice to have a room for guests to stay in the future, most of our families live nearby and I did not want to dedicate a space to something that would be used so sparingly. So I considered how we would best utilize the room.


Little Tomato is an avid reader, and has accumulated an impressive collection of books. Consequently, between her books and ours, we never seem to have enough bookshelves. And we both enjoy jigsaw puzzles; it is our favorite winter activity while Dad is watching sports! It would be advantageous to have a table dedicated to puzzles to avoid taking over the dinner table. Thus, I focused on a design that would support these interests- literature, puzzles, and the flexibility to accommodate guests.


I researched furniture options within budget and mocked them up together in Keynote to get a quick impression of how they look together.


I selected a daybed (with trundle) to accommodate guests when needed, as well as providing a seat for reading & puzzling. I selected a table with a folding top. The table can be positioned in front of the daybed and opened to use for puzzling or games, but can be folded and moved against the wall as a console table when the room is used for guests. And the bookshelves I selected absolutely maximize our space constraints (width AND height) along the wall to accommodate as many books as possible.*


*Remember the Pythagorean Theorem (A squared + B squared = C squared)? This equation is immensely useful to determine if a bookshelf is too tall to fit in your room. As a purely hypothetical example… You have a 96″ ceiling, and there is a 94″ tall bookshelf you want to buy, but your husband is super concerned that you won’t be able to clear the ceiling when you tip it upright and he thinks you should play it safe and get shorter bookshelves… you can determine that the tallest point when tipped = the square root of (depth (squared) + height (squared)). And that *hypothetical* 94″H x 15″D bookcase will *just* clear your 96″ ceiling (at 95.2″H diagonal when tipping it up).

Once the furniture was selected, I did a quick SketchUp model of the layout of the space to determine the best configuration.


Next I focused on the big empty wall without furniture. The window pours a lot of great natural light onto this wall, and I felt it needed a big graphic. However, a full wall of wallpaper gets very expensive, and frankly, too busy. With the detail on the rug, I needed something more simple.


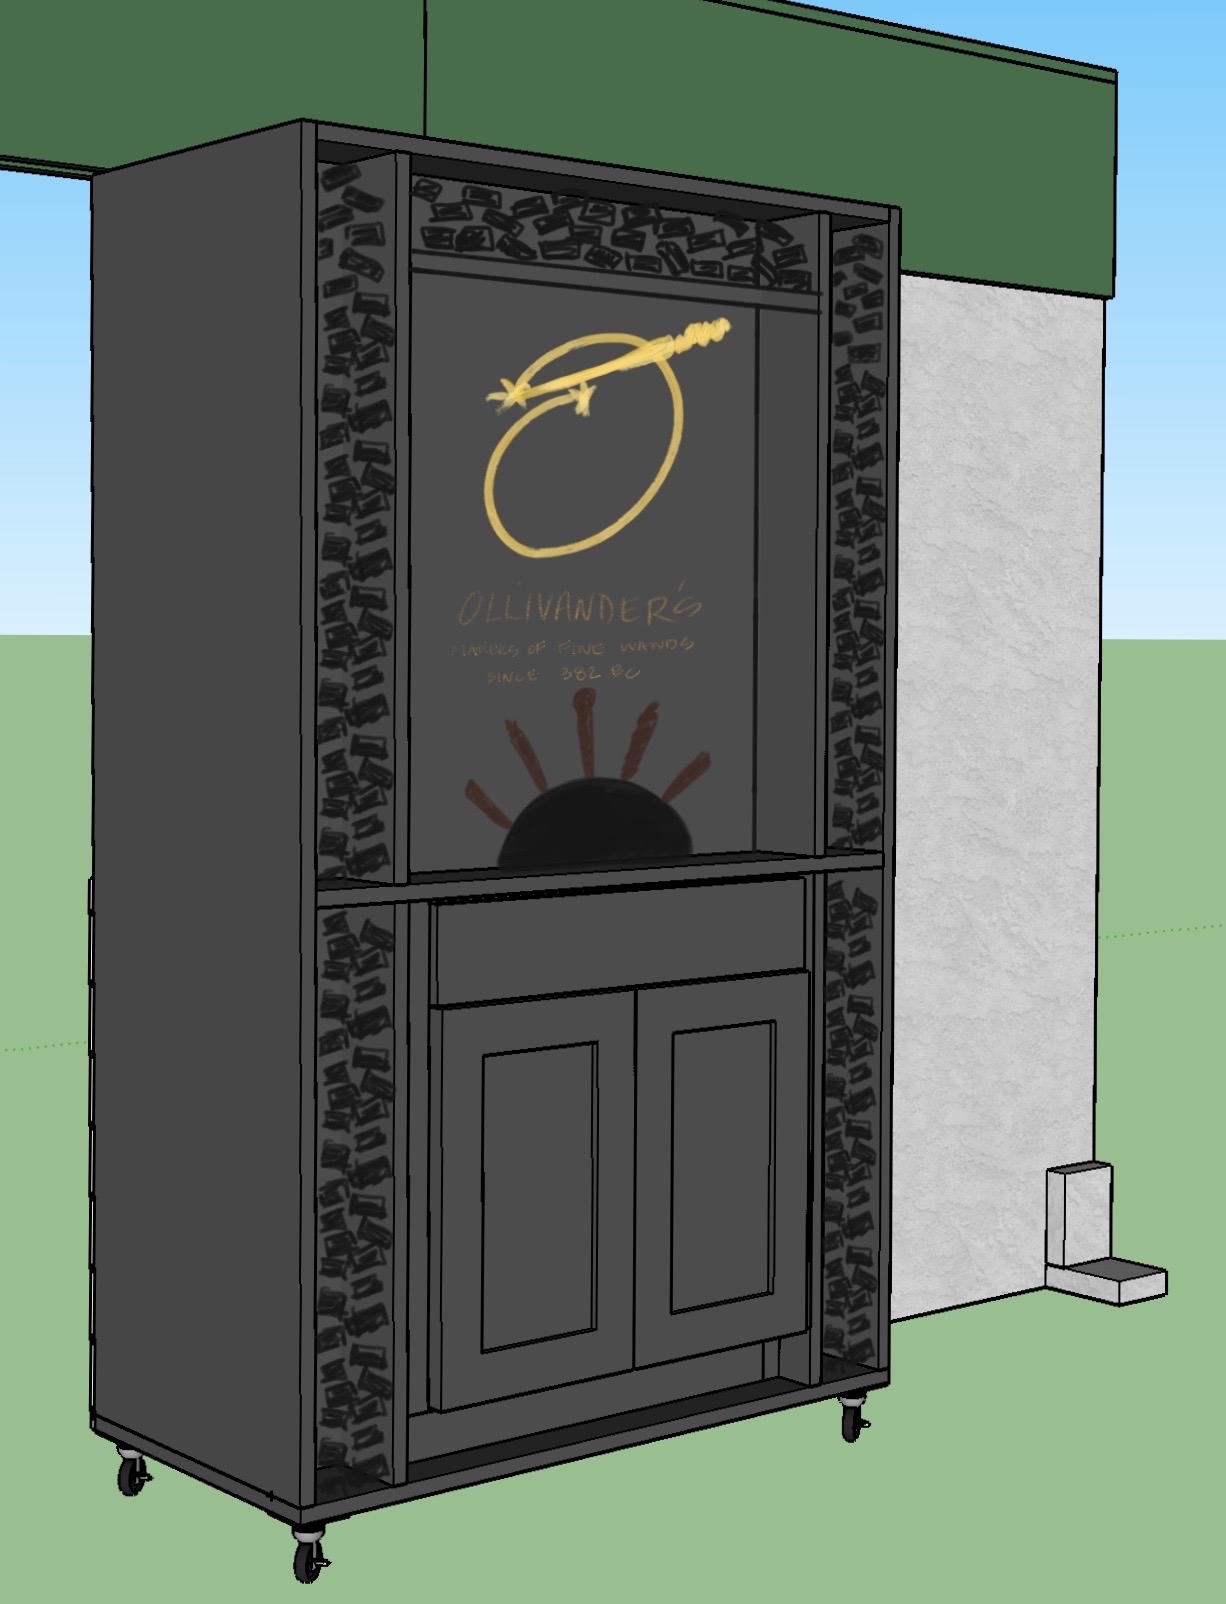
I decided to paint a mural instead. I liked the idea of something literature based, since books are so central to the room’s design. Little Tomato was really pushing for a Harry Potter theme, so I conceded. I mocked up a ‘Hogwarts & surrounding areas’ map in Photoshop and determined it was too busy. Then I saw a sketchy cityscape wallpaper mural on Etsy and determined that format would be perfect. I settled on a view of Hogsmeade with the cattywampus rooflines and chimneys, and a hint of the castle in the background.


I edited the proportions of a photo in Photoshop so the layout would properly scale on my wall dimensions. I printed the edited photo out and used trace paper over it to get the perspective correct for my sketch.


After several sketches, playing with the level of detail and sketch style...


... I narrowed it down to two options. I mocked them both up in Photoshop, and determined that the simpler version looked best with the rug.

Once I settled on the final sketch, I scanned it into my computer and projected it onto the wall… where I hit a bit of a snag. With the compact room size, I couldn’t back up the projector far enough for the image to fit properly on the wall. Even with lens adjustments, I just didn’t have enough distance. So I had to get creative and angle the projector *just so* in the farthest corner of the room to get as close as possible to the needed size. I used a pencil to sketch the basic outline, using minimal line work. Then I utilized additional reference photos of the street view to continue the buildings in the foreground where the initial image no longer properly filled out the wall space. This definitely added additional time to the prep work, but couldn’t be helped.

Once the layout was done in pencil, I began the slow process of painting using a paint sample can and a couple of varying sizes of paintbrushes.

A note on paint choice: On a previous wall mural I used Sharpie Paint Pens. While this would have been immeasurably faster and easier, it has a completely different final look. The Sharpie pens use an oil based paint and have a high gloss sheen. This provides a very stark contrast to the wall eggshell finish. The colors of paint pens are also limited. The Sharpie black is true deep black. I chose a latex ‘charcoal’ paint color which has an eggshell finish similar to the wall color. This, and the softer edge of the paintbrush, provided a more ‘hand drawn’ and natural sketch effect than the (easier) paint pens.


I kept the initial sketch and my phone with reference images handy during the painting process, adding details and adjusting as needed. I utilized the larger paintbrush for the foreground building outlines and then switched to a smaller paintbrush as I painted the background buildings and foreground details. Initially I considered filling in the signage in the foreground buildings (shop names & signs), but determined that it took away from the overall image. You can see the ‘Honeydukes’ sign filled in above, but that it was painted over in the final mural.


Once the mural was completed, I used the ‘wall color’ paint to go back and touch up over the exposed pencil lines. While an eraser does remove pencil lines, it changes the sheen/texture of the paint which is noticeable when natural light hits the wall.


The aforementioned bookcases were shockingly in stock and have been hoisted up the flight of stairs and set in place.* However, the other furniture is still yet to be delivered. We are slowly filling the bookshelves, and I am working on the artwork for the opposite wall while we wait for the other furniture to arrive. I will post a final walkthrough of the completed room once it is all here and set up. We are excited to start using it as our new space!


*A shoutout to my brother for helping with that heavy chore!

Quibbler Display Shelf

Thursday, May 29, 2025

Every year we add to our Halloween party props. This little project was in the back of my mind for some time. It also appealed to me because Little Tomato could use it as a bookshelf in her Cupboard Under the Stairs reading nook. The bookshelf was a basic $20 shelf found on Amazon HERE.


The fabric of the shelf was a cheap plastic-like white fabric. I purchased some thick black fabric yardage and used the ‘plastic’ fabric as a template to sew the new black panels.


The two solid side panels were an espresso colored laminate, so I painted them black to match the fabric as well. This provided the frame for the bookshelf.

The decorative Quibbler scroll at the top of the bookcase was freehand drawn onto a scrap piece of insulation foam. Insulation foam is pink, so the material needs to be primed prior to sketching and painting.


Once the paint was layered to my liking on the scrollwork, the spectrespecs were sketched and cut out of a smaller scrap of foam. They were painted and adhered to the base scroll sign, to add three dimensionality to the sign. The completed foam sign was mounted to a piece of black foam core board, and adhered to the backside of the bookshelf.


Once completed, it needed magazine props to look like a display. I found example Quibbler covers online & printed them onto cardstock. These were mounted to scrap cardboard to give them depth and rigidity. They can be easily stacked & moved out of the way when Little Tomato wants to store her books in the shelf too.

And here is the completed bookshelf in her reading nook - her own little cupboard under the stairs! 

Magical Key Box Tutorial

Thursday, May 29, 2025


Those who know Husband and me, know that we host an annual magical escape room party at Halloween. Each year we are expanding our props, decorations, and escape room game design. So when LitJoy Crate released a MAGICAL KEY collection, of course I had to collect them.


The level of detail and design is *on point.* These are not flat metal keys. They are fully 3-dimensional awesomeness and come with a complementing keychain. What they do not come with is a display. Once I received my first set of two, I inquired about the total number* in the collection, once fully launched, to devise a display.

Inspiration

I began looking up key displays, and my favorite images were all vintage hotel key displays. Rather than flat boards with key hooks, these old displays had boxes where the keys hung from top-mount key hooks. I liked how the play of shadow and depth in the boxes accentuate the key details more than the flat board style key hooks.

Design


Several years ago I salvaged a discolored dingy vintage print, solely for the gorgeous vintage frame. I grabbed it out of storage, yanked out all the old nails, glass, and print, and set the frame aside for this project.


Using the dimensions of the frame, I laid out the key slot sizes using painter’s tape and a dimensioned cutting mat. This allowed me to adjust the proportions with the keys and keychains to get the sizing right.
Once I had general sizes figured out, I drafted up a quick SketchUp model of the box with dimensioned pieces for my cutting plan.


Next I needed to decide the color of the box. I thought that showing a wood grain would get too busy with the intricate frame and keys, so I wanted to use a solid paint color.


Unlike vintage hotel keys, each of the LitJoy keys vary greatly in both design and color. I did a quick ‘paint bucket’ mockup of a few color combinations in SketchUp to decide color. I chose a flat charcoal color as a contrasting backdrop for the keys to pop against (the option on the right below). I ended up using some spare paint left over from my Ollivander’s display in our magical alley.

Construction

I had several scrap pieces of particleboard & hardboard in my workshop, so I utilized these pieces rather than purchasing wood. Since the box is painted, I didn’t need anything to match. In retrospect, I would have made the flat facia pieces a wood or MDF material rather than particleboard, as the flat finish of the paint I used shows some of the texture of the particleboard rather than a perfectly smooth face.


Cut Sizes – 1/2″ thick material:

Qty (2) 2-1/2″ x 31″ boards (light purple)
Qty (1) 2-1/2″ x 15″ board (light turquoise)
Qty (4) 2″ x 15″ boards (dark turquoise)
Qty (2) 6-1/2″ x 15″ boards (green)

Cut Sizes – 1/8″ thick material:

Qty (1) 16″ x 31″ backer board (grey)
Qty (4) 2-1/2″ x 8-1/2″ boards (orange)
Qty (4) 2-1/2″ x 8-3/4″ boards (yellow)
Qty (32) 2-1/2″ x 1/4″ strips (dark purple)


Once the pieces were cut, I laid it out (without adhesive) to verify that everything fit together as needed with the frame opening.

AC062601-B2E8-4750-81AA-FF420C5953D0IMG_8013


The vertical partitions between the key slots are thin 1/8″ material (to maximize the width of the individual key cubbies). The (32) little strips help these slide and hold in place, rather than using hardware or glue.


On (3) of the 2″ x 15″ boards (dark turquoise) and the (1) 2-1/2″ x 15″ board (light turquoise), measure and mark on the 15″ length for 3″, 6″, 9″ & 12″.


Adhere (glue) two of these 1/4″ strips on either side of your mark, leaving the thickness of your vertical slats between them (approximately 1/8, but err on the side of excess, since paint will swell the wood a bit). The strips will stick up a 1/2″ past the 2″ pieces, but will be fine once assembled.

Now it is time to paint!

You will want to pre-paint your parts before assembly. It is much easier to paint the flat pieces than the assembled unit. Touchup painting is done at the end.

IMG_8077


At this point, it is time to add the screw cup hooks. I purchased two different sizes of hooks, a smaller size for the facia boards to hang the keychains, and a larger size for the key hooks in the box. These are readily available at your hardware store. Mine were brass, and I wanted a more muted color, so I spray painted them a metallic bronze.


Mount the hooks in the center of the 5 sections of (2) of your 2″ x 15″ boards (dark turquoise) – (@ 1-1/2″, 4-1/2″, 7-1/2″, 10-1/2″ & 13-1/2″).


On the two facia boards (green), screw in the hooks at the same spacing (@ 1-1/2″, 4-1/2″, 7-1/2″, 10-1/2″ & 13-1/2″) approximately 2-1/2″ from the top of the board.

Time for Assembly!

Starting with the frame of the box, begin gluing together the components. Once your glue has set, add screws or nails to further strengthen the joinery. Since I used 1/2″ particleboard, it did not have enough density or strength to withstand screws (even with pilot holes, it was iffy), so I used nails to reinforce the joinery.


For more clarity, here is a diagram of assembly…

The vertical dividers between the key slots slide in between the strips that were glued to the (turquoise) pieces. Once all parts were painted, these were a SNUG fit, so I used a hammer to tap them into place. They definitely aren’t going anywhere!

Attaching the Frame:

To attach the frame, I grabbed a couple of wood scraps in my stash, and nailed them to the two long (purple) sides of the box. These need to be narrower than the frame, so they don’t stick out from the frame. Their length isn’t important, I think mine were approximately 15″ long.


Make sure your nail holes are going into the concealed section (between the turquoise supports, covered by the green facia boards). You don’t want to see nails sticking out your finished key slots!

Once these blocks were secured to the box, I *carefully* manually screwed these to the frame on the backside of the frame.


Make sure your screws are long enough to grab the frame, but not pierce through your frame. I highly recommend manually screwing rather than power tools for this part.


**I’m sure there is a more graceful or professional way to do this, but I had scraps laying around and it seemed to be a simple way to go about it.

Nameplates

Nameplates were cut from 1/8″ birch with a laser cutter and painted metallic gold (Rub ‘n Buff Metallic Gold Leaf)


Magical Alley: Slug & Jiggers + Potages Completed + New Owl Post!

Thursday, May 29, 2025


Slug & Jiggers + Potages were completed with the connecting signage, and false door (which was made out of scrap plywood, trim, and a spare door knob). Once complete, we moved onto the Owl Post! 

Owl Post

The Owl Post window is a half-round window display, fashioned after the windows in the WW. We used the same dowel base, but taller to accommodate our needed window height.

Our packages are a mix of kraft paper wrapped empty boxes and LitJoy crate boxes for the color and design pop to keep the window dynamic. We are continuing to add packages, but have at least set up a base of colorful post.


We also needed to add a feature to the display to give a focal point that wasn’t just wrapped packages. I was able to find an inexpensive wall-mounted resin owl, which I spray painted metallic. I added small magnets to the feet to allow me to attach interchangeable messages.


The message was printed on large format paper, and wrapped around a recycled paper towel roll for the scroll effect. I added a scrap of ribbon and a wax seal to the bottom for a little fancy (and to add weight to keep it from curling up).


Once we completed the construction of the Owl Post side of this display, we turned our focus onto the backside… my personal favorite window in the alley… Spindlewarps!


Construction is in progress, and will be shared in the next post.

Magical Alley: Apothecary & Potages

Thursday, May 29, 2025


The first post on the magical alley detailed the Flourish and Blotts mobile display [HERE]. Once this project was significantly completed, we began working on the Slug & Jiggers Apothecary & Potages windows that would face Flourish & Blotts across the alley walk.

Apothecary & Potages Layout:

After reviewing photos of Diagon Alley architecture and shop options, we settled on the layout in the image below. While the original shop configuration was a Wiseacres Wizarding Equipment & Potages Cauldron Shop, we decided to concentrate on Slug & Jiggers Apothecary and Potages Cauldron Shop.
In our years of hosting wizard Halloween parties, we had already accumulated a large collection of potion bottles and cauldrons which would fill the window displays without adding cost. The Wiseacres window display focuses on a collection of celestial and astronomical gadgets that would have taken significant time and materials to fabricate.


Once again, I took to SketchUp to work out the general dimensions and construction to calculate materials needed. This was a basic ‘blocking study’ that included major structural components. I did not waste time detailing out the model.


The Potages window display is a topsy-turvy stack of cauldrons, so the plan for this window display is to utilize the plastic cauldrons we have accumulated over the years. We have plans to make the top cauldron ‘self stirring.’


The Slug & Jiggers Apothecary windows are full of baskets of herbs and potion bottles, but there isn’t a feature element drawing attention to the display. However, there is another window in Diagon Alley (leading into Knockturn Alley) that is for the shop “Potions for All Afflictions.” This window features “Skelegro” with a whimsical character sitting in a cauldron. A potion bottle hovers magically in the air above his head, pouring the potion into his gaping mouth. I loved this window display and was bent on making it my Slug & Jiggers feature. My husband was skeptical, but knows better than to doubt my crazy ideas.


*The reason we didn’t make the window a ‘Potions for All Afflictions’ storefront is that I wanted the pop of the ‘Slug & Jiggers pink’ against the Potages charcoal facade. I wanted to make Diagon alley full of color and whimsy, in contrast to the dark and dreary Knockturn Alley shops.

Building Begins:

I drew up a sketch of my idea for the window to get a feel for the color combination and layout, and then we got to work building!


Husband and I boxed out the frames, and I ‘dirtied up’ some hardboard faux stone panels to make them look old and dingy.


We painted the basic components and began to assemble the window framing. The apothecary also included shallow shelves to display potion bottles.

SkeleGro Feature:


The next component to include was the feature potion drinker. I started with a scrap of insulation foam as the body and a couple of additional smaller scraps for the arms. I used a pencil to hand sketch the character and then cut the foam to shape.


Once the shape was cut out, I used acrylic paints to paint him. I used a picture of the original and my drawing as references to complete the details.


The arms were two separate pieces of foam, which gives the character a more 3 dimensional appearance. I used a screw and bolt (with washers) to join the arms to the body. They were spray painted matte black to blend in with his suit jacket.

Once the character was completed, I used a smaller scrap of foam to make the potion bottle which would be floating above him.

On the original character, the bottle appeared to be pouring the potion into his mouth. I wanted to achieve the same effect. To do this, I purchased a clear plastic tube from the plumbing department and covered it in hot glue ‘drips’ to give it more of a liquid-flowing appearance. Once the glue was cooled, I fed a color-changing LED strip light through the tube. This tube was adhered on the backside of both the bottle and the character to connect the bottle to his mouth.

After some time, the tube began to slacken and droop, so i strengthened the tube by feeding a wood dowel through it as well, to give it structure. The glue drips on the clear tube give it enough of a haze to conceal the light strip and dowel hidden within it.


While the Slug & Jiggers window display was underway, the Potages cauldrons were getting coats of spray paint to make them different metals (copper, pewter & silver). These will be stacked and displayed in the window soon, but I am still working out if I will add aging or ‘bubbling over’ on them to give the display some additional character.


The next step is to detail out the faux doorway between the shops and to complete and hang the sign above the storefronts and add molding/trim details to finish it out…

Magical Alley Begins

Thursday, May 29, 2025


We did not host our annual Halloween party in 2020 due to the pandemic. However, our summer was occupied with building a shed workshop instead of our usual puzzle planning. With the shed newly completed, our Halloween props and decorations have migrated into storage out of the house and into the shed. {Phew!}

This spurred a conversation of hosting the annual Halloween game out there instead of our home… which in turn allowed me to go full-out-crazy on additional ideas. If they aren’t squeezing into my living space, I can be much more ambitious…

We are now building a magical alley for our party. When a trip to the grocery or hardware store is a treat, it is a creative outlet that is keeping us busy and sane.

Husband and I brainstormed how we wanted the space to work, and what we wanted to include. We had already created components for Knockturn Alley in previous years, so we worked out how to utilize these pieces in their new home. As the space is used for a game, we looked for a balance of storefront windows to observe as well as a shop to explore and rummage through. The Halloween game is part of the fun!

Flourish & Blotts Storefront

Once we created an idea of components, I began building a few quick Sketchup models of components to get approximate sizes and materials lists determined. The first piece I worked out was the Flourish & Blotts window display. This wall is a divider between the storefront and shop interior, so both the front and back were to be considered. Since we are NOT building structural walls in this space for a Halloween party, the wall partitions are simply 4′ x 8′ x 2″ insulation foam panels. We designed 2×6 wood feet supports to hold them upright for a quick and easy separation of space. A cap overlays the top of the panels to help keep them aligned together and display signage.


I did not want a flat wall of shop fronts. Part of the fun of Diagon Alley is the three dimensional and dynamic shops. The Flourish and Blotts storefront would be the most challenging, as it is in the middle of the room, without wall support, and would need to be mobile and easy to disassemble. While the insulation panels provide the flat wall panels, a three dimensional element needed to be included.
Last year, I scored a cheap base cabinet. I bought it with the idea of using it as the basis of a mobile window display. The idea was to mount it onto casters and use it as a base to build upon – utilizing both the front AND back of it as a shop front window AND an interior shop display.
The shop interior is a ‘catchall’ magical shop, where we will display all magical props – books, robes, potions, etc. One feature I wanted to include on the shop interior was an Ollivander’s wand display. Ollivander’s, with its cattywampus shelves and dusty wand boxes, is the epitome of wizard shopping. The back of this cabinet was designed to be this display.


Adding Details: Ollivanders Interior Shop Side


Once the paint was dry, it was time to start adding details.
Using scraps of wood from building the shed, we cut 2×4 ends in random sizes. These were spray painted red, blue, and yellow and then mounted in a cattywampus manner to backer boards cut to fit in the side openings of the wand display.


Wand labels found HERE were adhered to the painted wood pieces. After all adhesive was dried, a light layer of dark spray paint was misted over the ends to give them a dusty, aged look. The completed boards were then screwed into the side and top openings of the wand display. Even though these elements are only a 2″-3″ deep, they are perceived to be full depth wand boxes in shelves…. like magic!
I took my foam Ollivander’s Wand sign that was made for an earlier party, cut down the size, and added a frame using leftover molding and gold spray paint. This was mounted in the center as the display signage. A wand display will be added to showcase a few wands, it is on the ‘to do’ list!


Adding Details: Flourish & Blotts Exterior Shop Side


Onto the exterior widow display side! The front interior window is hinged to allow us to access the display and change as needed.

Once again, I played with the perception of depth to make the window appear deeper than it is in reality. Using scraps of insulation foam that were too small for additional signage or props, I printed off magical book covers and wrapped the foam in a cover. The covers are cut short, as the depth of the ‘books’ are really only 2″-3″ deep. The books were stacked on top of the shelves as well, to give the ‘bursting at the seams’ feel of the wizard shops. Since these are just paper-wrapped-foam scraps, this also keeps down the weight of this mobile unit.


The window display really needs to include feature elements to make it pop. There are two windows flanking the doorway on the original shop. One window features the Gilderoy Lockhart ‘Magical Me’ book advertisement, the other features a cage of ‘Monster Book of Monsters.’
As we are constrained by space, we have a single window display. We decided to make both of these features in our window. We already have a ‘Monster Book’ that I made as a prop for a previous party, so we set out to construct the cage next.


Once again, using scraps of wood (from constructing the windows), we assembled the cage. The cage bottom utilized a scrap of MDF board that was left over from another project. The original cage was made of metal with studded caps on the intersections of the straps, so I grabbed some plastic craft jewels I had in my stash and glued these onto the wood pieces to give it detailing. The whole cage and base was then spray painted metallic black.


Another great detail of the ‘Monster Book of Monsters’ display was the pile of shredded pages that was underneath it. These books are clearly caged for a reason, they are eating other books! Little Tomato joined in on the fun and helped me shred a book for the cage carnage. We used an old, stained, outdated German/English dictionary for this purpose and hand-shredded the pages to create uneven and un-uniform scrunched up strips. This was spread over the bottom of the display, where the messy eater was caged.


The final project for this window display is the Gilderoy Lockhart book advertisement. This is a framed poster of Gilderoy. As wizard photography is not static, but moves…. we have plans for this. It is a project in our list that will be added to this post once completed!

Home Escape Room Tools: Locks, Boxes, & Bags

Thursday, May 29, 2025

 Home escape room parties are different than the professional game rooms that you pay to play. Unless you are willing to spend significant sums of money to develop or purchase custom locks, boxes, and ciphers for your game, it is much more cost effective to utilize commercially available products as your game elements. You are also able to reuse them for future games that are not in the same theme. After several years of hosting escape room parties for our friends, we have found some supplies that we found to be useful.

Locks are readily available from simple keyed and 3 digit locks (most common) to more specialty locks, such as 4 & 5 digit locks, letter locks, and even specialized locks (ex. RFID).

I have included a few recommendations on locks below that we have used with success for our games.

*I do not receive compensation for these reviews. The views and opinions expressed on this blog are purely my own.

Locks

For our escape room parties (and kits), we utilized a variety of keyed, digit, and letter lock solutions. This gave a more varied solution from lock to lock to keep the game more dynamic.

We also developed a conversion card to convert the longer (4 & 5 digit & letter) solutions into a 3 digit lock solution, as the 3 digit locks are more readily available and often less expensive.

I have included a few recommendations on locks below that we have used with success for our games.


Lockable Bags & Hasps


In order for something to be locked away, it needs to be enclosed in a lockable container. This can be as small as a bag or as large as a room.
For the purpose of home escape room games, you can get creative with things you already own. Look for a container that has two holes that the shank of the lock can loop through, such as a toolbox, pencil/ tool pouches, etc.
If you are looking to purchase lockable items for your game, I have included a few recommendations below!


Lockable Bags


When looking for lockable bags, you need a zipper with a hole on the end of the zipper pull that is large enough for the lock to slip through and a fabric loop on the end of the bag.

Pencil pouches and tool bags are commonly designed with these features.

The down side to lockable bags is that players can ‘cheat’ and bend the bag to get the zipper open. However, as long as you are moderating the game, you can prevent these cheats. It is, by far, the most affordable way to lock up the clues and they store easier than boxes after the game.


Lockable Hasps


If you have a toolbox, most often they are already set up to be lockable. Money boxes are also lockable, but these may have a key rather than a combination lock. Many craft stores carry affordable unfinished wood boxes for crafts. These are great to decorate for your theme (wizard supplies, etc.) However, most don’t have a lockable hasp. You may purchase a lockable hasp and retrofit them onto these boxes to be usable for your escape room.

I have included links to options for both lockable bags and hasps below. One thing to note: the lock needs to have a small shank for many hasps. The three and four digit locks noted above were chosen for this reason – they have smaller shanks that more readily fit into common hasps.


Lockable Boxes

If you are looking for a box with a built-in lock, there are many lock boxes available online. This allows you to not purchase a separate box and lock, however you will be ‘locked in’ (pun intended) to using the type of lock the box utilizes. For example, if you purchase a 3 digit number lock box, you will not be able use it for a puzzle that solves for a 5 letter code.


With our escape room games, we designed a ‘conversion card’ that allows you to translate any 4 or 5 digit or letter solution into a 3 number solution. As the vast majority of combination lock boxes available are 3 number locks, this allowed the use of lock boxes we already owned to be used for a variety of puzzle solves that weren’t just 3 digit solves.


Lockable book boxes appear to be a book, but are actually a lockable box once opened. They can come as a keyed lock or a tumbler lock. While there are many ‘cover’ options available for purchase, you can also design your own dust cover or find book cover designs online as a themed option to cover the standard options available.


For our wizard escape room parties, we found magical book covers online and designed our own covers to create a magical book collection. While the majority of books were thrifted titles up-cycled into magical books, the book lockbox was hidden within the collection.


I have included links to a recommended lockable box and a book box below.


Combination Lock Box


Lockable Book Box


Proudly designed by | MLEKOSHI PLAYGROUND |